DevOps & observability / Tutorial
Multi-Stage Docker Builds for Node and Python: Smaller Images, Fewer Surprises
Learn multi-stage Docker builds for Node and Python with cache mounts, slim runtime images, non-root users, and digest pinning to cut bloat and build risk.
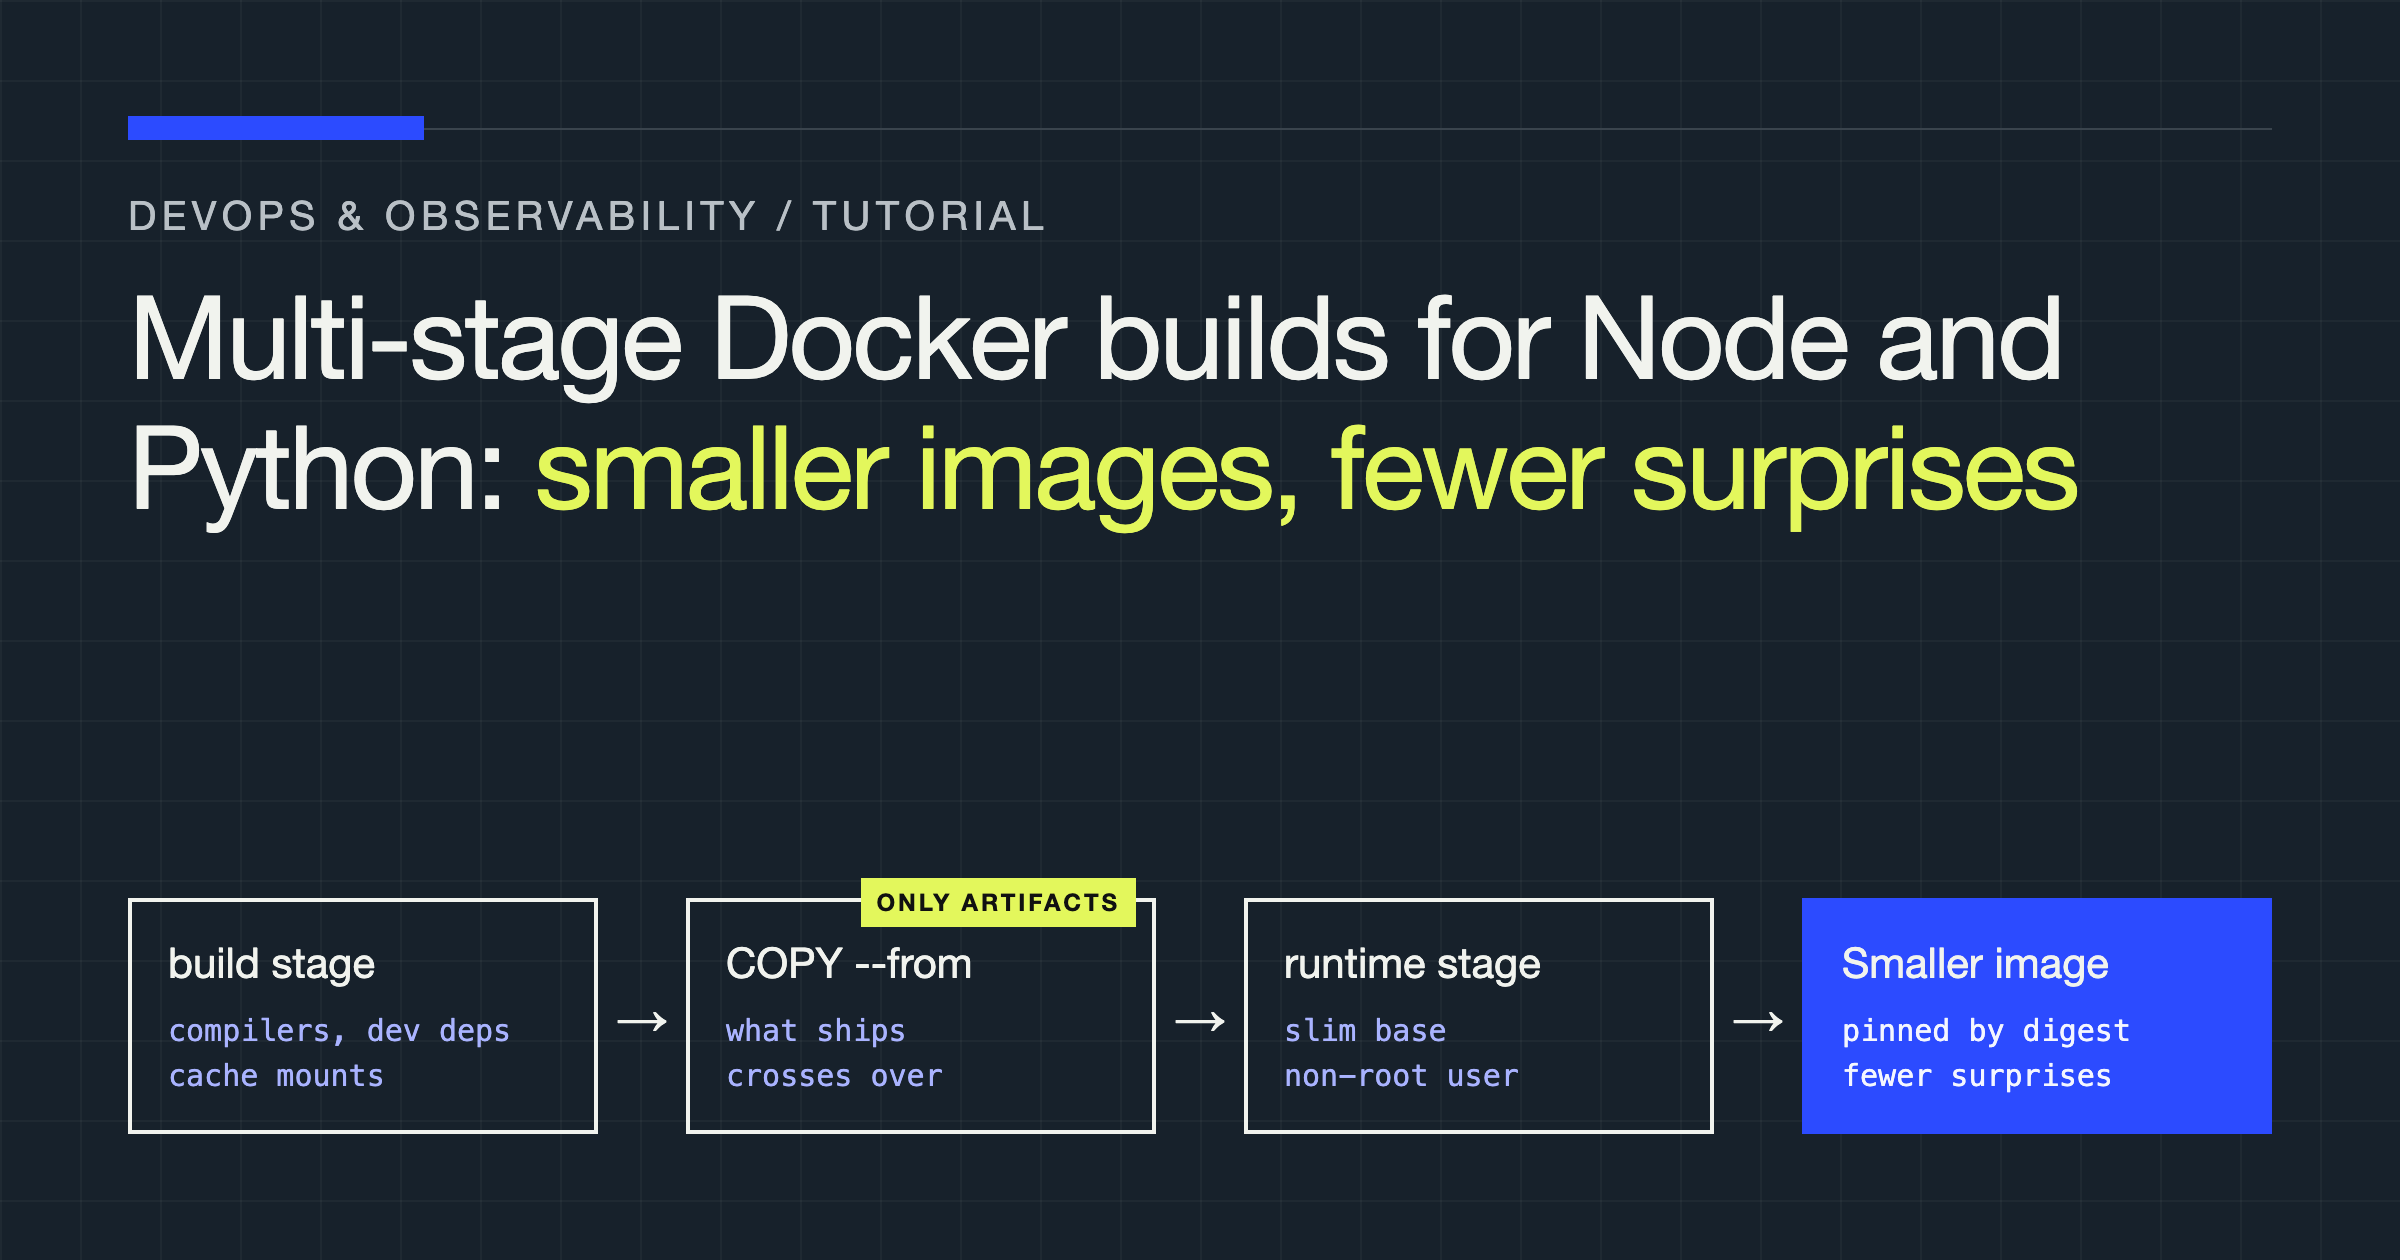
You will build two production images in this tutorial: a Node.js service and a Python service, each split into a build stage that installs and compiles everything, and a runtime stage that contains only what the application needs to run. Along the way you will learn how to order layers for reliable caching, how to keep secrets and development dependencies out of the final image, and how to choose between slim, Alpine, and distroless bases without breaking native code.
Why a single-stage image causes problems
A conventional single-stage Dockerfile installs a compiler, package manager caches, development headers, test tools, and source files, then leaves all of it in the image you ship. That creates three separate problems.
First, size and pull time grow because every build tool becomes payload your orchestrator has to store, distribute, and extract on every node. Second, your attack surface grows: a shell, a compiler, and unused packages are all available to an attacker who gains code execution inside the container. Third, behaviour drifts: development dependencies left in the image can mask a missing entry in your production dependency list.
Multi-stage builds solve this structurally rather than by cleanup. You name each stage with AS, do messy work early, and use COPY --from=<stage> to move only selected artefacts into the final stage. Anything you do not copy explicitly does not ship, no matter how messy the build stage was. Deleting files in a later layer of a single-stage build does not achieve the same thing, because the earlier layer still exists in the image history and can still be extracted.
The pattern every multi-stage build follows
Whatever the language, the shape is the same:
- A dependencies stage installs from a lockfile, so the result is reproducible.
- A build stage compiles, transpiles, or builds wheels using the full toolchain.
- A runtime stage starts from a fresh, minimal base, copies in only artefacts and production dependencies, creates an unprivileged user, and defines the start command.
Two rules make the pattern work. Keep the stages on compatible bases, especially when native code is involved, and copy artefacts deliberately instead of copying the whole build directory.
Node: separate build dependencies from production dependencies
TypeScript, bundlers, and test frameworks belong in the build. Your runtime needs the compiled output, package.json, and production node_modules only. The cleanest way to guarantee that split is to install production dependencies in their own stage rather than pruning a full install and hoping the prune was complete.
# syntax=docker/dockerfile:1
FROM node:22-bookworm-slim AS deps
WORKDIR /app
COPY package.json package-lock.json ./
RUN --mount=type=cache,target=/root/.npm npm ci

FROM node:22-bookworm-slim AS prod-deps
WORKDIR /app
COPY package.json package-lock.json ./
RUN --mount=type=cache,target=/root/.npm npm ci --omit=dev

FROM node:22-bookworm-slim AS build
WORKDIR /app
COPY --from=deps /app/node_modules ./node_modules
COPY package.json package-lock.json tsconfig.json ./
COPY src ./src
RUN npm run build

FROM node:22-bookworm-slim AS runtime
ENV NODE_ENV=production
WORKDIR /app
COPY --from=prod-deps --chown=node:node /app/node_modules ./node_modules
COPY --from=build --chown=node:node /app/dist ./dist
COPY --chown=node:node package.json ./
USER node
EXPOSE 3000
CMD ["node", "dist/index.js"]
Several details matter here. npm ci installs exactly what package-lock.json describes and fails if the lockfile and package.json disagree, which is the behaviour you want in an automated build; npm install can silently resolve something different. The cache mount persists the npm download cache between builds without baking it into any layer, so repeat builds download less while the shipped image stays clean. If your project is plain JavaScript with no compile step, drop the build stage, but keep prod-deps separate — that stage is what keeps devDependencies out of production.
Pruning with npm prune --omit=dev also works, but do it in the build stage and copy the pruned tree across — never in the runtime stage, which would need npm present in the shipped image.
Python: build a virtual environment, then copy it whole
Python has no single node_modules folder by default, so the portable unit is a virtual environment. Create it at a fixed path in the build stage, install into it, and copy that path unchanged into the runtime stage. Because a virtual environment contains absolute paths and interpreter symlinks, the copy only works when both stages use the same Python version, the same architecture, and a compatible base — which is another reason to keep the bases aligned.
# syntax=docker/dockerfile:1
FROM python:3.12-slim-bookworm AS build
ENV PIP_DISABLE_PIP_VERSION_CHECK=1
WORKDIR /app
RUN python -m venv /opt/venv
ENV PATH="/opt/venv/bin:$PATH"
COPY requirements.txt ./
RUN --mount=type=cache,target=/root/.cache/pip \
    pip install -r requirements.txt
COPY src ./src

FROM python:3.12-slim-bookworm AS runtime
ENV PYTHONDONTWRITEBYTECODE=1 \
    PYTHONUNBUFFERED=1 \
    PATH="/opt/venv/bin:$PATH"
RUN groupadd --system app && useradd --system --gid app --home-dir /app app
WORKDIR /app
COPY --from=build --chown=app:app /opt/venv /opt/venv
COPY --from=build --chown=app:app /app/src ./src
USER app
EXPOSE 8000
CMD ["python", "-m", "src.main"]
Pin your dependencies with a fully resolved file, for example a requirements.txt produced by your lock tool of choice, and install from that file only. Installing from loose version ranges in the Dockerfile makes two builds of the same commit produce different environments.
For packages you build yourself, use the wheel pattern instead: run pip wheel --wheel-dir /wheels -r requirements.txt in the build stage, then install from those wheels into the virtual environment. Wheels make the artefact explicit and auditable, at the cost of extra care with source-only packages that need a compiler at install time.
Do not set PIP_NO_CACHE_DIR alongside a cache mount and expect both to help. The cache mount is the mechanism that reuses downloads between builds; disabling the cache inside the build defeats it. Choose the mount for builds run through BuildKit, and leave the cache directory out of the final image by never copying it.
Layer caching: order instructions from stable to volatile
Docker reuses a layer only when the instruction and everything it depends on are unchanged. A single changed file invalidates its COPY layer and every layer after it in that stage. You exploit that by ordering instructions from least to most frequently changed: base image and system packages first, lockfiles next, dependency installation after that, and your source code last.
That is why both examples copy package.json and package-lock.json, or requirements.txt, on their own before copying source. Editing application code then reuses the expensive dependency layer, while editing the lockfile correctly triggers a reinstall. The common anti-pattern — COPY . . followed by an install — busts the dependency cache on every source edit, including a change to a README that has nothing to do with the application.
Expect two cache surprises even with correct ordering. First, cache is local to the builder unless you export it, so a fresh machine or ephemeral runner starts cold; use cache mounts for downloads and, where your pipeline supports it, registry-backed build cache to share layers between runners. Second, a cache mount is not a layer: its contents speed up a command but are not committed to the image, so a build depending on files left in a mount is not reproducible. Keep mounts for downloads and incremental compiler output only.
Your .dockerignore file is part of caching too, because it defines the build context that COPY hashes and sends to the builder:
.git
node_modules
__pycache__
.venv
dist
.env
.env.*
!.env.example
*.md
Dockerfile
docker-compose.yml
Excluding .git, local dependency folders, and environment files keeps the context small, prevents a local node_modules tree built for your workstation from overwriting the one installed in the image, and stops a stray file edit outside the application from invalidating layers.
Harden the runtime stage
Multi-stage builds give you a small image. These steps make it a safer one.
Run as a non-root user. Create the user in the runtime stage, copy files with --chown so you do not need a separate RUN chown layer, and set USER before the entrypoint. If your application writes files at runtime, give it a specific writable directory owned by that user instead of running as root to make the problem disappear.
Never place secrets in a layer. Do not use ARG or ENV for credentials, and do not COPY a .env file: build arguments and layers can be inspected from image history. If a build step genuinely needs a credential, for example to reach a private package registry, pass it as a BuildKit secret mount, which is available only to that one command and is not stored in the image:
# syntax=docker/dockerfile:1
FROM python:3.12-slim-bookworm AS build
WORKDIR /app
COPY requirements.txt ./
RUN --mount=type=secret,id=pip_index_url \
    PIP_INDEX_URL="$(cat /run/secrets/pip_index_url)" \
    pip install -r requirements.txt
You supply that secret at build time with docker build --secret id=pip_index_url,env=PIP_INDEX_URL ., and you keep runtime configuration out of the image entirely, injecting it through your orchestrator or environment when the container starts.
Pin base images by digest as well as by tag. A tag such as node:22-bookworm-slim can be republished to point at a different image; a digest reference, written as name:tag@sha256: followed by the digest you resolved from the registry, cannot. Resolve digests with your registry tooling, record them in the Dockerfile, and update them deliberately through the same review process you use for a lockfile change. Pinning trades automatic base updates for reproducibility, so you need a routine, scheduled or manual, that proposes digest bumps — otherwise pinning quietly becomes a way to run an old, unpatched base forever.
Choosing a runtime base
| Base | What it contains | Strengths | Watch out for | Choose it when |
|---|---|---|---|---|
| Debian slim | Core utilities, glibc, package manager | Broad compatibility with prebuilt binaries | Larger than the alternatives, more packages to patch | You have native dependencies and want the fewest surprises |
| Alpine | musl libc, minimal utilities, apk | Small footprint, fast pulls | musl can break wheels and prebuilt binaries built for glibc; some packages compile from source and build slowly | Your dependency set is pure or known to support musl |
| Distroless | Application runtime and libraries, no shell or package manager | Minimal attack surface, nothing extra to execute | Harder to debug because there is no shell to exec into; you must copy in everything you need | The service is mature and you debug through logs, metrics, and ephemeral tooling |
| Full language image | Toolchain, headers, utilities | Nothing to add, convenient for development | Ships build tooling to production | Development and build stages only, not the runtime stage |
The Alpine trap deserves emphasis. Many Python wheels and Node prebuilt binaries are published for glibc systems. On Alpine, pip or npm may fall back to building from source, which needs a compiler, slows the build, and can produce a subtly different result. Test the exact dependency set on the base you intend to ship, and treat a base change as a release-level change.
Failure modes worth checking before you ship
Development dependencies in production. Verify the final image directly: list installed packages from the runtime container, and confirm your test framework, linter, and build tools are absent. A stage you forgot to copy from, or a --omit=dev flag dropped during a refactor, is enough to reintroduce them.
Architecture and library mismatch. Copying a virtual environment or node_modules between stages built on different bases or architectures produces errors at import or load time rather than at build time. Keep build and runtime bases aligned, and if you build for a different target platform, build the dependencies for that platform too.
Cache invalidation you did not expect. A changed lockfile should invalidate the install layer; a changed timestamp or an unpinned base should not silently change your dependencies. If builds feel random, inspect which layer rebuilt and work backwards to the COPY or base change that caused it.
Running as root by accident. A later stage that omits USER, or an entrypoint script that re-execs as root, undoes your hardening. Check the effective user of the running container, not just the Dockerfile text.
Files owned by the wrong user. Copying without --chown leaves artefacts owned by root, so a non-root process may fail to read configuration or write temporary files. Set ownership at copy time.
Verdict and recommendation
Start with the three-stage shape for both services: lockfile-driven dependencies, a build stage with the full toolchain, and a runtime stage on a Debian slim base, running as a non-root user, with production dependencies installed separately for Node and a copied virtual environment for Python. Order every Dockerfile lockfiles first and source last, add a strict .dockerignore, use cache mounts for package downloads, pass build credentials as secret mounts, and pin your bases by digest with a deliberate update routine.
Reach for Alpine only after verifying your exact dependency set, including every native module and wheel, on musl. Reach for distroless once the service is stable and your debugging workflow no longer depends on a shell in the container. In all cases, judge the result by inspecting the final image — its contents, its user, and its dependency list — rather than by trusting the Dockerfile.